Order Details
Who this is for: merchant staff viewing or updating a single order. Open any row from the Orders list to work a single order (or shipment). This page covers page layout, header actions, shipment-scoped vs. whole-order views, fulfillment and payment cards, the customer sidebar, tags, timeline, risk, ERP metadata, and edit, refund, and return workflows.
In this guide:
- Page Layout
- Order Summary
- Product Information
- Payment Information
- Fulfillment Information
- Purchase Order Information
- Edit Order
- Refunds and Returns
Page Layout
From the orders list, click the order name or anywhere on the row. For a shipment row, detail opens scoped to that shipment (title and totals match the shipment). The breadcrumb shows Orders (icon) → order number; click the orders icon to return to the list with your prior filters preserved.
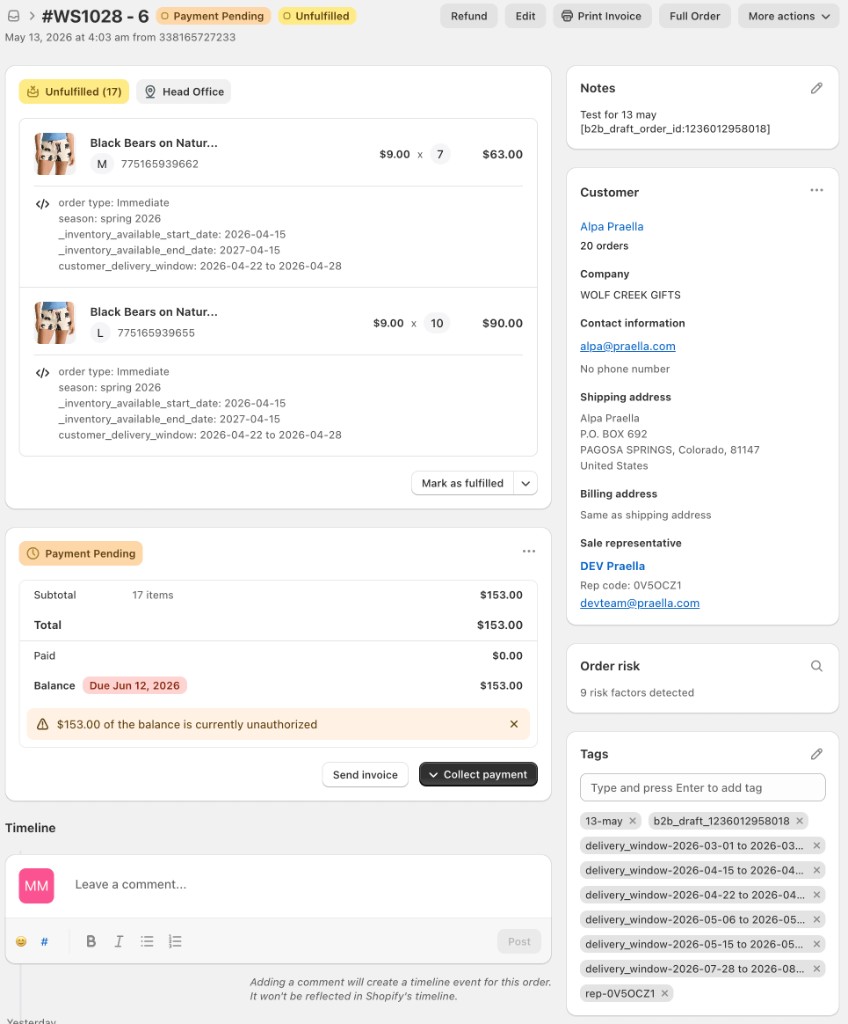
Order detail uses a two-column Shopify Admin layout:
| Column | Contents (top to bottom) |
|---|---|
| Main (~2/3) | Fulfillment cards, return summaries, Payment card, Timeline |
| Sidebar (~1/3) | Notes/PO number, Customer, Order risk, Tags, Meta details (ERP ID when set) |
Fulfillment and payment badges in the page header reflect the selected shipment when you opened detail from a shipment row; otherwise they reflect the whole order.
Page header
Title and subtitle — The title shows the parent order number (for example #1042), or the shipment order number when a shipment is selected. The subtitle shows order date/time and channel (for example Online Store).
Status badges — Badges appear next to the title when applicable: Cancelled, payment status (Paid, Payment pending, Partially paid, Refunded, etc.), fulfillment status (Unfulfilled, Partially Fulfilled, Fulfilled, On hold, etc.), Return in progress, Returns closed, and Archived.
Secondary actions (header buttons)
| Button | When shown / what it does |
|---|---|
| Code icon (View JSON) | Always — opens View JSON, the export payload for the selected shipment or whole order |
| Refund | Paid, partially paid, or partially refunded — opens the refund flow |
| Return | Fulfilled lines eligible for return — opens the return flow |
| Edit | Not cancelled at shipment level — opens edit order; shipment-scoped when a shipment is selected |
| Print Invoice | Always — opens Print Order modal (invoice preview; browser print) |
Refund and Return are hidden when the order is cancelled; Edit is hidden when the selected shipment is cancelled.
More actions menu
| Action | Effect |
|---|---|
| Archive / Unarchive | Toggle archived state (confirmation modal) |
| Open in Shopify | Opens the native Shopify Admin order in a new tab |
| Cancel order | Cancel eligible orders (hidden when archived, partially paid at current scope, or when a shipment must be picked first) |
| Delete order | Only when order status is cancelled |
| Export Actions | Same synchronous downloads as the list row Actions menu (Order XLS, Product Data XLS, LineSheet PDF, Order PDF) |
Downloads respect shipment scope when you opened detail from a shipment row.
View JSON
Click the code icon in the page header to open a full-screen JSON viewer. The payload is the same ERP export envelope returned by the external orders API (order object with ids, customer, financial/fulfillment status, line items, and related fields).
| Control | What it does |
|---|---|
| ← (back) | Returns to order detail |
| Parse | Pretty-printed, syntax-highlighted JSON (default) |
| Raw | Minified single-line JSON (slashes escaped like API responses) |
| Copy | Copies the active tab's JSON to the clipboard |
Scope depends on how detail was opened: a shipment row (or single-shipment order) shows that shipment's export payload; a parent order row with multiple shipments shows an error asking you to open a shipment row first; a parent order row with no shipments shows the whole-order export when available. If export data is missing, the viewer shows an error object instead of order fields.
Shipments on order detail
When shipment grouping applies, one Shopify order has multiple shipments. Detail behavior depends on how you arrived: opening the parent order row shows a whole-order view (fulfillment groups aggregate all shipments; payment card uses order-level totals), while opening a shipment row shows a shipment-scoped view (title, badges, fulfillment blocks, and payment lines reflect that shipment only).
There is no in-page shipment tab bar. To work on another shipment, go back to the orders list via the breadcrumb, then open the other shipment row for the same parent order. Each shipment row deep-links so refresh keeps the same shipment selected.
| Concept | Whole order | Selected shipment |
|---|---|---|
| Line items / fulfillment | All fulfillment groups | That shipment's lines only |
| Payment totals | Order-level subtotal, tax, shipping, balance | Shipment subtotal and total where applicable |
| Returns block | Returns with lines on any shipment | Returns filtered to that shipment's lines |
| ERP ID (sidebar) | Hidden until a shipment is selected, if multiple exist | Shipment externalId when configured |
| Edit | /editOrder/[id] | /editOrder/[id] with shipment context |
| Cancel order | Allowed when eligible | Allowed when eligible (blocked with no shipment selected if multiple exist) |
| View JSON | Full order export if one shipment or none | Shipment export JSON; error if multiple shipments and none selected |
Banners and loading states
| Banner / overlay | Meaning |
|---|---|
| Test order | Order has a test tag — payment gateway was in test mode |
| Fulfillment error | Last fulfillment action failed — dismissible |
| Mark as paid error | Collect payment failed — dismissible |
| Customer success | Contact or address update saved |
| Archive success | Archive/unarchive completed |
| "Refreshing order…" loader | Returned from edit order (fromEdit=1 in URL) while webhooks sync totals |
| "Redirecting to orders…" loader | Fulfillment flow redirect in progress |
Order Summary
Customer Information
The Customer card consolidates B2B buyer context.
Customer menu
| Item | When |
|---|---|
| Edit contact information | Always |
| Edit shipping details / Add shipping details | Depends on whether a shipping address exists |
| Replace B2B customer | Order has a Shopify customer and B2B company name |
Displayed fields
| Section | Content |
|---|---|
| Name | Link to Shopify customer admin when ID exists |
| Order count | Link to orders list filtered by customer_id |
| Company | B2B company name |
| Contact information | Email (linked), phone |
| Shipping address | Full formatted address when set |
| Billing address | Separate block, or "Same as shipping address" |
| Sales representative | Rep name (links to orders filtered by rep_id), rep code, checkout rep code, email (links to Sales Reps), phone, optional rep metadata |
Orders without a customer show a Customer search/create control so staff can assign or create a customer.
Contact edit modal — Email and phone fields with validation, plus an optional Update customer profile checkbox to persist changes on the Shopify customer record. Email updates may hit rate limits (a cooldown after rapid changes).
Replace B2B customer modal — Search company contacts and confirm replacement — the buyer on the order changes while staying on the same company.
Company Information
The B2B company name associated with the order, shown on the Customer card.
Shipping Address
The full formatted delivery address when set.
Billing Address
Shown as its own block, or "Same as shipping address" when identical.
Sidebar — Order risk
Order risk loads Shopify risk analysis when available: "Loading…" while pending, "N risk factor(s) detected" with a magnifier to open detail when risks are found, or "Analysis not available" when none exists.
Sidebar — Tags
| Control | Behavior |
|---|---|
| Edit (pencil) | Opens tag modal with autocomplete from store tags |
| Quick add field | Type tag and press Enter |
| Tag pills | Click × to remove (syncs to Shopify) |
Tags on the order sync to Shopify; errors show in a dismissible banner on the card.
Sidebar — Meta details (ERP ID)
When settings enable external ERP integration and an id exists for the current scope, the Meta details card shows an ERP ID — the shipment's externalId when a shipment is selected, otherwise the order-level id when applicable. If multiple shipments exist and you opened the parent order without selecting a shipment, the ERP id may not display until you open a shipment row.
Main column — Timeline
When the order is linked to Shopify, the Timeline component loads Shopify timeline events and supports staff comments where enabled. Use the timeline for audit — payment terms changes, fulfillment events, staff notes. For long internal notes, use the sidebar Notes card instead.
Product Information
| Field | Description |
|---|---|
| Ordered Products | Line items shown in the Unfulfilled / Fulfilled / On hold / Removed fulfillment cards |
| Quantities | Per-line quantity; unfulfilled quantities editable via Edit order |
| Pricing | Line price, reflected in the Payment card subtotal |
| Warehouse | Fulfillment location badge on the fulfillment card |
| Inventory Type | Immediate, Future, Prebook, or an alias, inherited from the inventory record the line was ordered against |
| Season | Inventory season tied to the line; used for order splitting when Season is the configured property |
| Requested Ship Date | Delivery/availability date the line was ordered against, used for delivery-window-based order splitting |
When a shipment is selected, fulfillment cards show Unfulfilled (lines still to ship), Fulfilled (shipment cards with tracking, delivered date, invoice links), On hold (held lines, hold reason, release/add hold actions), and Removed (refunded or removed quantities, read-only). Each card can show a location badge from the order's fulfillment location name.
When viewing the whole order, the same card types render per fulfillment group from the API (fulfillmentGroups), which may span multiple shipments. If the order has returns, return summary blocks appear above the payment card, filtered to the selected shipment when applicable.
Payment Information
| Field | Description |
|---|---|
| Payment Status | Financial status badge — Paid, Partially paid, Pending, etc. |
| Payment Terms | Net-terms template and due date when terms are applied |
| Balance Due | Outstanding amount shown in the Payment card summary rows |
The Payment card shows financial status, line-item economics, and collection actions.
Payment card header — A large financial status badge (same family as the header badges); a ⋯ menu appears when a balance is owed, offering Add payment terms or Edit payment terms.
Summary rows
| Row | Detail |
|---|---|
| Original order | Shown when current total differs from original placed total |
| Subtotal | Line count × prices; shipment-scoped when a shipment is selected |
| Shipping | Shipping amount from payment summary |
| Tax | Expandable tax lines with rates |
| Discount | Expandable discount lines |
| Paid | Gross captured; $0 when still payment pending |
| Refunded | Per-refund rows with item count and reason when available |
| Balance | Outstanding amount; Due date and net-terms badge when terms apply |
| Past due | Red Due styling when the due date is before today and balance remains |
Warnings inside the card
| Banner | When |
|---|---|
| Refund owed | Shopify outstanding balance is negative — Manage refund button |
| Unauthorized balance | Authorized but uncaptured amount on whole-order view |
Action buttons (footer of Payment card)
| Button | Action |
|---|---|
| Send invoice / Resend invoice | Opens send-invoice modal (draft vs. sent state) |
| Collect payment | Mark as paid (manual/offline payment) |
Collect payment and the terms menu are hidden when balance is zero, the order is paid/refunded, or a refund is owed.
Collect payment on the order
When balance is due, click Collect payment:
| Action | When to use |
|---|---|
| Mark as paid | Manual confirmation (check, wire, offline) |
| Capture payment | Authorized card payment ready to capture (when enabled) |
Errors display inline on the payment card. For full or partial payment against a B2B Plus invoice record (card or manual methods), use Collect payment on the invoice detail page instead. See Payments and Invoices.
B2B Plus invoices
B2B Plus invoices are formal bills tied to orders. Typical flow: Generate creates a draft invoice and PDF; Send queues an email to the customer on the order (one click, no compose step); Manage lets you track status on the Invoices page, collect payment, or void as needed.
- Order-level invoice (Payment section) — Use when billing the whole order (or split total shown in Payment). Scroll to Payment on order detail, click Generate invoice, wait for Invoice generated, then click Send invoice (or Resend invoice later). The email goes to the address on the Customer card — confirm it is correct before sending.
- Fulfillment-scoped invoice (Shipment card) — Use when billing one shipment after fulfill — common for split or partial ship workflows. Open the Fulfilled shipment card, open the row menu, and click Generate invoice (first time) or Send invoice / Resend invoice / View invoices once the record exists.
Payment terms (net terms)
Add or edit payment terms on eligible orders from order detail:
| Field | Meaning |
|---|---|
| Template | Net 30, Net 60, etc. (from store templates) |
| Issue date | Start of the terms clock |
| Due date | Calculated from template + issue date |
Remove payment terms when switching to immediate payment. A Past due badge appears when the due date is before today and a balance remains; due dates on sent invoices follow the order's payment terms.
Tips: Split totals — payment may be order-level while fulfillment is split-level; read both badges. Order vs. fulfillment invoice — generate from Payment for the order total, or from the shipment ⋯ menu for one fulfillment only. Generate before Send — Send invoice is available only after Generate invoice for that scope. Refunds reduce paid amount.
Fulfillment Information
| Field | Description |
|---|---|
| Fulfillment Status | Unfulfilled, Partially Fulfilled, Fulfilled, On hold, etc. |
| Warehouse Assignment | Location each fulfillment group or shipment ships from |
| Fulfillment Actions | Mark as fulfilled, Mark as on hold, Mark as in progress; tracking and invoice actions |
Fulfillment is the largest block on the main column. Order detail groups line items into blocks. Split orders scope everything to the selected split; non-split orders use fulfillment groups (grouped by warehouse, delivery window, season, etc.) with the same section types.
| Section | Contents |
|---|---|
| Unfulfilled | Items not yet shipped; fulfill actions available |
| Fulfilled | Shipped items as shipment cards (tracking, delivered, invoices) |
| On hold | Fulfillment orders held — reason badges and release actions |
| Removed | Unfulfilled quantity removed by order edit or cancel-style refund (display only) |
Removed vs. returned
| What you see | Meaning |
|---|---|
| Removed section | Lines or quantity dropped before ship (edit order or refund of unfulfilled stock) |
| Info banner on a Fulfilled card | "X item(s) are refunded from this fulfillment" — fulfilled stock returned via return/refund |
| Return flow | Separate from Removed — see Refunds and Returns below |
For cancelled or refunded shipments, unfulfilled actions are hidden, though fulfilled history may still display after a partial return/refund.
Before you fulfill
- Open the order from Orders.
- If the order has splits, select the correct split in the split selector (open the correct shipment row from the list).
- Confirm the location badge on the fulfillment card matches the warehouse you intend to ship from.
- Check payment status — refunded or voided orders hide unfulfilled actions (fulfilled history may still show).
- If your store uses rep approval, ensure the order is approved before fulfilling.
Mark as fulfilled (two-step flow)
Fulfilling is a two-click process: first enter editing mode, then confirm.
Step 1 — Start fulfillment — In the Unfulfilled card, click Mark as fulfilled (or the primary button on the segmented control). The card enters editing mode with: line checkboxes and quantity fields (partial fulfill per line); an "X items selected" header checkbox to select or clear all lines; Tracking number and Shipping carrier fields; Add another tracking number for multiple IDs on one shipment; and a Send a notification to the customer checkbox.
Step 2 — Confirm or cancel — Adjust selected lines and quantities as needed, optionally enter tracking and carrier (can be left blank for pickup or internal fulfill), then click Mark as fulfilled again to submit, or Cancel to exit editing mode without shipping. On submit, inventory validation may run when on-hand checks are enabled, with errors appearing on the fulfillment card. On success, the page refreshes and returns you to the Orders list after a few seconds — open the order again if you need to fulfill remaining lines.
Partial fulfillment — Uncheck lines you are not shipping yet, or lower the quantity field (for example, fulfill 1 of 2). Remaining quantity stays in Unfulfilled for a later fulfill.
Fulfillment actions menu — On the unfulfilled card, the dropdown next to Mark as fulfilled may include Mark as in progress (opens the fulfillment order for picking) and Mark as on hold (enters the hold reason flow). Actions on fulfilled shipment cards (row menu) depend on state and can include Edit tracking, Mark as delivered, Cancel fulfillment (restock rules apply), and Generate/Send/Resend invoice. Create shipping label is not available in the current admin UI.
Tracking
At fulfill time — While in editing mode: enter one or more tracking numbers, choose Shipping carrier from store carrier services (loaded when editing starts). All tracking numbers on one submission share the same carrier.
After fulfillment — On a shipment card, use Add tracking when the shipment has none yet, or Edit tracking (row ⋯ menu) when it already has tracking — this lets you update carrier and tracking numbers, add another tracking ID, and optionally send a notification email to the customer. Tracking links appear on the shipment card and on the orders list Delivery status column.
On hold and in progress
On hold — When a fulfillment order is on hold, a single On hold card shows hold reason badges (or Awaiting payment when no detail is stored). Use Release hold when ready to pick and ship, or Add hold to attach another hold reason. From unfulfilled, open the ⋯ menu → Mark as on hold (or Add hold on an already-held split). Select a Hold reason (required — staff-only visibility); if the reason is Other, enter Reason notes. Click Mark as on hold.
In progress — When a fulfillment order is open or in progress, the unfulfilled area reflects an active pick/pack state. Use Mark as in progress from the ⋯ menu to open the fulfillment order. Mark as unfulfilled may appear but is limited depending on Shopify's fulfillment-order state.
Shipment cards (fulfilled)
Each fulfillment appears as a card showing a Fulfilled (n) badge and location badge, fulfillment name/split order number, fulfilled date or delivered status with date, carrier tracking links, Actual Ship Date when set from ERP metadata, the line items included, Add tracking / Mark as delivered buttons when applicable, and a row menu for editing tracking, cancelling fulfillment, or invoice actions.
Per-shipment invoices — When invoicing is enabled, use the shipment row menu for Generate invoice (first bill for this fulfillment), Send invoice / Resend invoice (email the customer after generating), and View invoices (open PDF links when multiple exist).
Tips: Two clicks — the first Mark as fulfilled opens editing; the second click submits. Stay or leave — after success you are redirected to the orders list; reopen the order to fulfill remaining lines. Inventory — validation runs before submit; check Inventory for committed quantity and warehouse if it fails. Partial fulfill — lower quantity or uncheck lines; the rest stays Unfulfilled. Tracking only — after fulfill, use Edit tracking or Add tracking; do not re-fulfill. Removed ≠ returned — Removed is pre-ship; fulfilled refunds show on shipment cards.
Purchase Order Information
| Field | Description |
|---|---|
| Purchase Order Number | Read-only in the sidebar Notes/PO number card when present on order metadata |
| Customer Notes | Read-only notes from the customer, shown in the same sidebar card, editable by staff via the pencil icon |
Empty states show "No notes from customer" / "No PO number". The Edit note modal accepts up to 5,000 characters.
Edit Order
Who this is for: merchant staff adjusting an existing order before it is fully fulfilled. Current scope: the edit page supports quantity updates on existing lines, shipping fees, and a staff reason note. Adding a product, swapping SKU, mass delivery-date changes, and discounts are not available in the UI today.
- From order detail, click Edit (hidden when the shipment is cancelled). For the whole order, open Edit from the parent order; for a shipment, open Edit from the shipment row on the orders list or from shipment-scoped order detail. The page starts a Shopify order-edit session (begin → apply changes → Update order commits).
- Change Quantity on Unfulfilled lines (set to 0 or click × to move a line to Removed).
- Optionally Add shipping fee or Edit shipping fees in the Payment card.
- Optionally enter Reason for edit (staff-only note, saved as the Shopify staff note on commit).
- Review the Summary sidebar, then click Update order when inventory is valid.
Page layout
| Area | Purpose |
|---|---|
| Unfulfilled | Editable quantity per line; remove (×) sets quantity to 0 |
| Fulfilled | Read-only — fulfilled quantities cannot be changed |
| Removed | Lines set to 0; increase quantity to restore before saving |
| Payment | Subtotal, shipping fees, total, amount paid |
| Reason for edit | Optional staff note on commit |
| Summary (sidebar) | Lists pending changes; Update order saves |
An info banner notes that third-party apps may not recognize Shopify order edits — test with a sample order if you rely on integrations.
Quantity rules
| Rule | Detail |
|---|---|
| Fulfilled qty | Shown in Fulfilled; inputs are disabled |
| Decrease qty | Always allowed; releases committed inventory |
| Increase qty | Checked against available inventory |
| Minimum | Quantity cannot be negative |
When you increase quantity above what inventory allows, the page blocks save and shows warnings on the line row (yellow banner), quantity field (red error text), and Summary (Update order stays disabled). Validation runs after you stop typing. Only additional units above the original unfulfilled quantity count toward the limit — lowering quantity does not trigger this error.
Shipping fees — Use Add shipping fee (when no shipping lines exist) or Edit shipping fees (when shipping lines exist). Title is optional (defaults to "Shipping"); cost is required. The Edit shipping fees modal lists each fee with edit and remove controls, plus an Add shipping fee link.
Shipment-scoped edits — When opened from a shipment row, the subtitle shows shipment context (for example Split 1 of 2) and edits apply to that shipment's lines; commit returns to the same shipment on order detail.
Update order is disabled when no changes were made, a save is already in progress, or any line has an inventory quantity error. Leaving the page with unsaved changes prompts a confirmation modal.
Refunds and Returns
Who this is for: merchant staff issuing refunds and managing returns.
When to use each flow
| Flow | Open from | Use when |
|---|---|---|
| Refund | Order detail → Refund | Refund money without a formal return record — unfulfilled cancel, partial refund, or fulfilled refund without an RMA |
| Return | Order detail → Return | Fulfilled items are coming back and you need tracking, a label, or restock on the return card first |
| Process and refund | Return card → Process and refund | The return is open; issue payment back and close the return in one step |
Choose your path
- Unfulfilled only — Use Refund on the unfulfilled section; quantity is removed from the order and can restock at a location.
- Fulfilled, no RMA needed — Refund on fulfilled lines works, but you cannot start a return for those items afterward; prefer Return first if you need labels, tracking, or card-level restock.
- Fulfilled with RMA — Return, then manage the return card, then Process and refund when goods are back (or policy allows).
Button visibility
| Action | Shown when |
|---|---|
| Refund | Order is paid, partially paid, or partially refunded |
| Return | At least one fulfilled line still has returnable quantity |
| Both hidden | Order is cancelled, unpaid, voided, or fully refunded |
For split orders, select the correct split on order detail before clicking Refund or Return — eligible quantities follow the active split.
Refund
From order detail, click Refund.
Unfulfilled lines — Enter quantity to refund per line (max shown as / N); refunded units are removed from the order. Choose Restock at location when locations are available (unfulfilled refunds always restock open quantity).
Fulfilled lines — Enter quantity per fulfilled line, optionally check Restock items at and pick a location, or leave unchecked for manual restock. Once refunded, you cannot start a return for those items — use Return first if you need an RMA workflow.
Shipping, reason, and payment — Optionally refund shipping (partial or full when shipping was charged), add an internal Reason for refund, review Summary (item subtotal, taxes, shipping, Refund total), choose refund method (original payment, store credit, or split between both), and optionally Send notification to email the customer when refund is finalized.
Click Refund $X to submit. After submit, the app waits briefly for Shopify to sync, then returns you to the Orders list — open the order again if you need to refund remaining lines. Refunded unfulfilled quantity may appear under Removed on order detail.
Create a return
From order detail, click Return. Lines are grouped by shipment (for example #1006-F1 — Shipped from Shop location). Enter quantity per line (/ N is the returnable max). When quantity is greater than zero, choose a Return reason (Wrong item, Size, Defective, Customer changed their mind, Other with a required note, etc.).
Return shipping options
| Option | When to use |
|---|---|
| Create a return label in Shopify | US primary location + US customer address (eligibility shown on the page) |
| Upload a return label | PDF/PNG/JPG file or label URL, plus optional tracking and carrier |
| No shipping required | Pickup, in-store return, or label handled outside the app |
An optional return shipping fee can be deducted from the expected refund (summary sidebar). Review the Summary — return items, fees, Expected refund — then click Create return. After submit, you return to order detail; a Return in progress badge appears on the header and a return card is added below fulfillment.
Manage returns on order detail
Each return shows a status badge (Return in progress or Return closed), a return name (for example #1006-R1), line items/quantities/return reason, tracking or label details when configured, and Process and refund to issue payment and close the return.
Return card menu
| Action | Effect |
|---|---|
| Close return | Close without refunding (when policy allows) |
| Upload / Download / Remove return label | Manage the label file or URL |
| Edit tracking | Update carrier and tracking on the return shipment |
| Shipment tracking | Open the tracking URL when available |
| Restock | Select quantities to restock from the return (inline editing on the card) |
| Remove items | Remove units from the open return |
| Cancel return | Cancel the return (destructive) |
When all returns are closed, the header may show Returns closed.
Process and refund
When the return is ready to settle financially, click Process and refund on the return card, review the banner (submitting refunds in Shopify and closes this return), confirm fulfilled line quantities (pre-filled from the return), check Restock items at and location if inventory should go back on hand, add an internal Reason for refund if needed, and click Process refund and close ($X). Refund method is Original payment for return refunds and is not changeable; Send notification can be unchecked if the customer shouldn't be emailed.
Refunds reduce paid amount and outstanding balance on net-terms orders; the due date is unchanged unless you edit terms separately. Invoices already sent may need a credit or new invoice depending on your process — void or adjust on the Invoices page when applicable. Restock on refund or return increases available inventory at the chosen location; committed-order snapshots in the Inventory module update after Shopify refund/return webhooks — allow a short delay.
Tips: Return before refund (fulfilled) — if you need labels or return tracking, create Return first; do not refund fulfilled lines and then try to return them. Partial refund — refund shipping or line partials where Shopify allows; max quantities update after each refund. Store credit — available on the standard Refund page, not on Process and refund.