Importing Inventory
Bulk inventory updates run through CSV upload on the Inventory page. Use this guide to format your file, choose an update mode, and resolve import issues.
In this guide:
- Download Sample CSV
- Prepare CSV File
- Upload CSV
- Import Validation
- Import Results
- Common Import Errors
Download Sample CSV
Use the sample CSV template as a starting point — it includes the correct headers and example rows, and helps avoid formatting mistakes on the first upload.
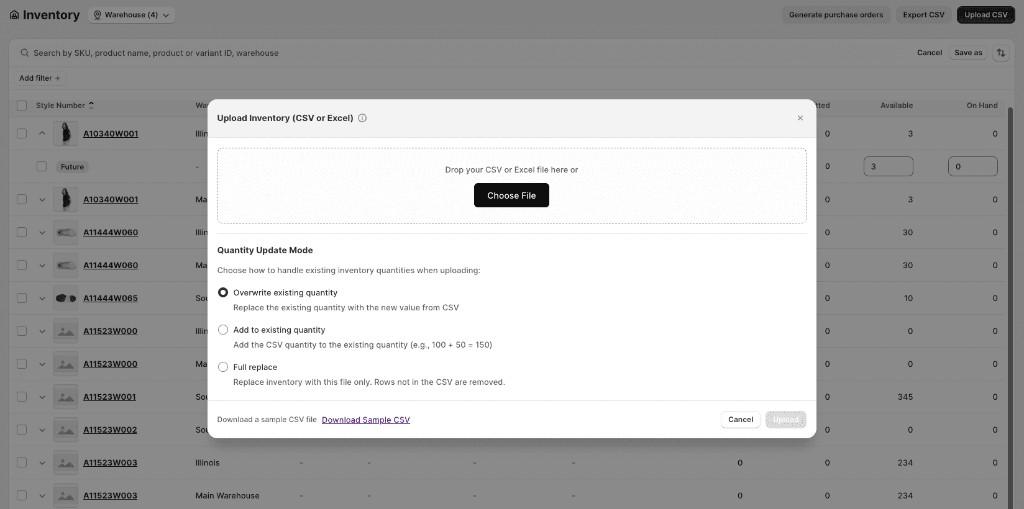
From the Upload CSV modal, click Download Sample CSV at the bottom of the dialog before you choose a file.
Prepare CSV File
Required headers
| Header | Description |
|---|---|
| STYLE NUMBER | Product SKU |
| QUANTITY | Sellable quantity |
Optional headers
| Header | Description |
|---|---|
| UPC | Universal product code |
| WAREHOUSE | Shopify store location ID |
| SEASON | Inventory season (e.g., Summer, Winter, Fall, Spring) |
| TYPE | Immediate, ATS, Future, ATS Future, Prebook, or Booking (case-insensitive) |
| PO NUMBER | Purchase order number |
| AVAILABLE FROM DATE / AVAILABLE END DATE | Availability window |
| ON HAND, COMMITTED, INCOMING | Physical, reserved, and on-order quantities |
| DAMAGED, QUALITY CONTROL, SAFETY STOCK, OTHER UNAVAILABLE | Unavailable-bucket quantities |
Multiple warehouses
You can upload inventory for multiple warehouses at once — include multiple Shopify location IDs across rows in the WAREHOUSE column; each location becomes its own record.
CSV example
STYLE NUMBER, SEASON, QUANTITY, WAREHOUSE, TYPE, AVAILABLE FROM DATE, AVAILABLE END DATE
Example rows:
SKU-001, Summer, 100, 12345678, Immediate(no dates)SKU-002, Fall, 50, 12345678, Future, 09/01/2025, 11/30/2025SKU-003, Winter, 0, 12345678, Prebook, 01/15/2026, 03/31/2026
Upload CSV
Quantity update modes
| Mode | Behavior |
|---|---|
| Overwrite | Replace existing quantities with CSV values |
| Add | Add CSV values to existing quantities |
| Full replace | Delete all records not in the CSV and replace with CSV data (requires preflight acknowledgment if committed stock exists) |
Use Download Sample CSV in the modal to get a correctly formatted template before your first upload.
Steps
- Click Upload CSV on the Inventory page
- Drop your file or click Choose File
- Select the Quantity update mode
- Review any warnings or errors in the preflight check
- Click Upload to process the file
Import Validation
When using Full replace mode, the system checks for:
- Records that would be deleted
- Any committed stock on those records
- The total committed quantities affected
If committed stock exists, the warning must be acknowledged before proceeding — this prevents accidentally deleting reserved inventory.
Committed stock during Full Replace
The system warns you and requires acknowledgment before deleting any records that have committed quantities.
Import Results
Large files process in the background, with a progress banner showing status.
Completed uploads show a summary of success and error counts. Every upload — including failed rows with error detail — is tracked in Logs → Upload History → INVENTORY_UPLOAD. See Activity logs.
Can I undo an inventory upload?
There is no automatic undo — upload corrected data instead, and consider keeping backup snapshots before large or Full replace uploads.
Common Import Errors
| Issue | Solution |
|---|---|
| Invalid file type | Use CSV, XLS, or XLSX files only |
| Missing headers | Ensure required columns (STYLE NUMBER, WAREHOUSE, QUANTITY) are present |
| SKU not found | Verify the SKU exists in the Shopify catalog and has synced into B2B Plus |
| Warehouse not found | Use the Shopify store location ID in the WAREHOUSE column |
| Date format errors | Use a consistent date format (MM/DD/YYYY or DD/MM/YYYY, based on store settings) |